So, you’ve finally decided to try your hand at manual mode. Yippee! Being able to use the manual setting on a camera is the first indicator that you are moving away from amateur photography and into the big leagues. But, now you are staring at all of the options on your camera and wondering just what the heck to do next. Well, let’s see if we can clarify the most important camera settings that every photographer should master.

Don’t worry. I’m not going to throw a whole bunch of confusing terms at you. I’m not going to make this anymore difficult than it has to be. In fact, I want to try to make this as easy to understand as possible.
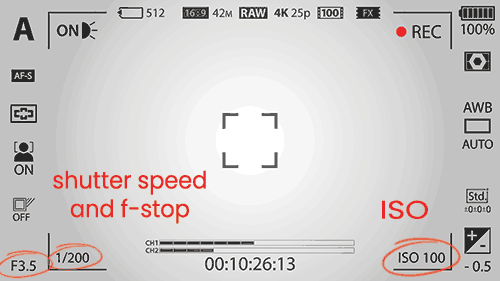
So, let’s just jump right in and introduce these all important camera settings and get going. Ready? Okay. They are ISO, aperture, and shutter speed. That’s it! If you can master these three settings, you will have conquered a major step in professional photography.
To help make this easier, I will try to use the analogies that I found to work for me when I first started to learn these terms. As I am sure you have heard before, the camera is sort of like a human eye. So, I find it is easier to picture that in my mind.
Each one of these three settings effects the way the other will perform. The trick is to get all three configured so that it compliments the other two. It can be tricky and sometimes downright aggravating.
In addition to that, each one of these settings has a downside. Well, not necessarily a downside. I suppose it is more accurate to say that each one has a give and a take.
What you want to achieve will determine which one of those two options you want to utilize. But, don’t get anxious over it. I will lay it out in easy to understand terms.
3 Most Important Camera Settings

ISO
This setting determines your camera’s sensitivity to light. The range on most cameras start at 100 and can go to 6400 or even higher. If you set it to a low number, let’s say 100, it will tell the camera that there is a whole lot of light available. Likewise, if you set to a very high number, it will tell the camera that there is little to no light available.
The trick to remembering what this setting does is to ask yourself “How IS it Outside?” If the sun is providing you with lots of bright light, you can use a low setting. If it is dark and you do not have enough supplemental lighting, then you would need a higher setting.
As I mentioned above, each setting has its own give and take. With ISO the low settings mean that you must have adequate lighting to get a good picture. Yes, you can adjust the settings to a higher setting to make the camera less sensitive, but with that comes a bit of graininess.
To get super crisp results, you need a low ISO. Whenever possible, try to use enough lighting and alter the other settings so that you can keep a low ISO. I strive for an ISO of 100 but occasionally will have to adjust up to 200.
Aperture:

Of these camera settings, aperture was the one that I had the most difficulty with wrapping my head around. It is often referred to as the f-stop or as the depth-of-field. Three different ways to refer to the same setting is part of the reason why it can be so confusing.
The aperture controls the amount of light that is allowed into the camera as well as the depth of field. Some people, myself included, are initially thrown off by the fact that a high number is less light and a low number is more. But, when it comes to depth-of-field, the exact opposite is true.
To be extremely technical, because I know someone is going to call me out on it if I fail to mention this to you, the f-stop and the aperture are not the same thing. The aperture is the diameter of the opening and the f-stop is the focal length divided by the diameter.
But, none of that really matters if you can’t clearly understand how it works. What you have to remember here is that the aperture is basically the pupil of the eye.
When the light is strong, the pupil closes up to reduce how much can get in. If you raise the aperture setting (or f-stop) the pupil closes and less light gets in. If you lower the setting the aperture opens up allowing more light to pass through. In other words, an aperture setting of 4 will allow in way more light than a setting of 10.
Now to address how that affects the depth-of-field. A low setting will give you less depth-of-field, or
If you want one of those images that feels like you can step right into it and walk to the other side, a high aperture is what you are after. On the other hand, if you want that blurring background effect (bokeh) then a lower setting is a must.
If you find it hard to remember which way to go on the aperture setting, just forget about the ability it has to control the lighting (for now) and just focus on how it effects the depth of field. To see farther away, use a higher setting. For real estate shots a good range is between 9-11.
Shutter Speed
Think of the shutter speed as your eye blinking. The faster you blink the less amount of stuff you let in before your eye closes. If you blink slowly, your eye has the opportunity to process so much more. The same thing happens with your camera.
Just like ISO and aperture, the shutter speed also controls two different things. It first and foremost controls the light that is allowed in. It also controls motion. Now, let’s take a look at how it does this.
You will notice on your camera that shutter speed is measured in fractions (1/60, 1/40, 1/20) of a second. You can adjust how fast the shutter closes to create different exposures. Slow it down when you need more light and speed it up if things are being over exposed.
You can also use shutter speed to control motion. Let’s say you want to capture a flowing river. Do you want the water to have a blurry artistic look, or do you want to stop the water and capture all the detail. You make the changes with your shutter speed.
You can use this same control to capture sporting events or children playing. A faster speed will capture the action without blurring anything. Just remember those gives and takes. Faster means less light. So, you would want to use it in a very well lit area.
Wrapping it all up
So, how do you get those three things to work together for you? I would recommend that you figure out which aspect is most vital to your image. Is it distance? Is it capturing motion? Is it overcoming bad lighting?
Once you make that determination, you can begin by addressing that issue first. For instance, if I want a real estate shot, I would set my aperture first. Then, I would go with the lowest ISO possible for the amount of lighting that I have available. Finally, I would begin to adjust the shutter speed until the exposure is correct.
Another example would be that flowing river. Here, you would want to adjust the shutter speed first to capture the motion the way that you want. Then, you would need to set you ISO and finally your aperture.
Make adjustments to the aperture and ISO until you reach a happy medium for what is acceptable to you. (i.e a higher ISO will be cleaner, but you may have to sacrifice some of the depth to achieve it, depending on the amount of light).
Final Comments:
This is just a breakdown of the most important camera settings. Each photographer develops a style and a feel for how they wish to utilize them. But, knowing what they do and how they effect the results will go a long way to helping you find your own.
Now that you have finshed this post, you may want to check out these:
How to Create Presets in Photoshop
How to Make Your Own Green Screen
How To Take Wide Angled Photos with Your iPhone


Please keep it clean. Comments that do not follow the Comments Policy may be removed.